TorchScript
PyTorch Ecosystem
PyTorch 支持 2 种独立的模式来处理研究和生产环境。
- Eager 模式:eager execution, 运行时构建计算图,中间计算结果会立即传输给python进程。
- Script 模式:graph execution, 直到整个图计算完成,状态才会返回到 Python 进程。两个组件,PyTorch JIT 和 TorchScript :
- Pytorch JIT 针对pytorch程序优化过的编译器。
- TorchScript 是 Python 语言的静态高性能子集。
简单地理解,TorchScript是一门脚本语言,PytorchJIT是这门语言的编译器,两者联合可以实现pytorch模型快速的计算,即从eager 模式切换到script 模式。
Basics of TorchScript
pytorch提供接口将eager模式定义的计算图(python代码调用pytorch的API实现,Module对象),转换成脚本语言定义的计算图(TorchScript就是这种脚本语言,ScriptModule对象),该计算图可以视作一种中间表达,是与Python runtime解耦的。
注意除了Module外,普通函数也可以转换为TorchScript代码,对应着ScriptFunction类,功能上等价于ScriptModule 。
比如,pytorch原生的模型定义如下:
class MyCell(torch.nn.Module):
    def __init__(self):
        super(MyCell, self).__init__()
        self.linear = torch.nn.Linear(4, 4)

    def forward(self, x, h):
        new_h = torch.tanh(self.linear(x) + h)
        return new_h, new_h

my_cell = MyCell()
x, h = torch.rand(3, 4), torch.rand(3, 4)
traced_cell = torch.jit.trace(my_cell, (x, h))
print(traced_cell)
traced_cell(x, h)
通过torch.jit.trace转换成了TorchScript形式,通过print(traced_cell.graph) 获取图的描述如下:
graph(%self.1 : __torch__.MyCell,
      %x : Float(3, 4, strides=[4, 1], requires_grad=0, device=cpu),
      %h : Float(3, 4, strides=[4, 1], requires_grad=0, device=cpu)):
  %linear : __torch__.torch.nn.modules.linear.Linear = prim::GetAttr[name="linear"](%self.1)
  %20 : Tensor = prim::CallMethod[name="forward"](%linear, %x)
  %11 : int = prim::Constant[value=1]() # /var/lib/jenkins/workspace/beginner_source/Intro_to_TorchScript_tutorial.py:189:0
  %12 : Float(3, 4, strides=[4, 1], requires_grad=1, device=cpu) = aten::add(%20, %h, %11) # /var/lib/jenkins/workspace/beginner_source/Intro_to_TorchScript_tutorial.py:189:0
  %13 : Float(3, 4, strides=[4, 1], requires_grad=1, device=cpu) = aten::tanh(%12) # /var/lib/jenkins/workspace/beginner_source/Intro_to_TorchScript_tutorial.py:189:0
  %14 : (Float(3, 4, strides=[4, 1], requires_grad=1, device=cpu), Float(3, 4, strides=[4, 1], requires_grad=1, device=cpu)) = prim::TupleConstruct(%13, %13)
  return (%14)
提高可读性,通过print(traced_cell.code)转换成遵循python语法的解释。
def forward(self,
    x: Tensor,
    h: Tensor) -> Tuple[Tensor, Tensor]:
  linear = self.linear
  _0 = torch.tanh(torch.add((linear).forward(x, ), h))
  return (_0, _0)
TorchScript是Python语言的子集,有些Python语法不支持。
好处:
- TorchScript有自己的解释器去调用TorchScript code,没有GIL,可以并行更快速;
- TorchScript code形式,不依赖于python,可以在不同语言环境中部署模型;
- 可以基于TorchScript code进行编译优化,加速执行;
- 可以和许多后端运行时进行交互
Converting Modules
有两个接口实现Module向ScriptModule 的转换:
- 运行追踪
torch.jit.trace: It has invoked theModule, recorded the operations that occured when theModulewas run, and created an instance oftorch.jit.ScriptModule. 使用example input,记录整个计算图的流程。没有执行过的操作不会被记录,所以不能记录类似if-else的“控制流”。 比如,模型定义如下:
class MyDecisionGate(torch.nn.Module):
    def forward(self, x):
        if x.sum() > 0:
            return x
        else:
            return -x

class MyCell(torch.nn.Module):
    def __init__(self, dg):
        super(MyCell, self).__init__()
        self.dg = dg
        self.linear = torch.nn.Linear(4, 4)

    def forward(self, x, h):
        new_h = torch.tanh(self.dg(self.linear(x)) + h)
        return new_h, new_h

my_cell = MyCell(MyDecisionGate())
traced_cell = torch.jit.trace(my_cell, (x, h))
trace 仅记录dummy input运行时实际执行的操作,所以条件语句if x.sum() > 0: 会根据当时的输入x选择一个固定分支,另一个分支不记录。如果要记录控制语句,就需要使用第二种转换接口,即scripting。
- 脚本编译
torch.jit.script: It does direct analysis of your Python source code to transform it into TorchScript.显式表明该模型需要TorchScript编译器直接解析和编译,不需要dummy input试运行。该模型定义受TorchScript语言施加的约束,因为TorchScipt只支持Python的部分语法。
scripted_gate = torch.jit.script(MyDecisionGate())

my_cell = MyCell(scripted_gate)
scripted_cell = torch.jit.script(my_cell)
print(scripted_gate.code)
print(scripted_cell.code)
此时控制语句会被如实解析转换:
def forward(self,
    x: Tensor) -> Tensor:
  if bool(torch.gt(torch.sum(x), 0)):
    _0 = x
  else:
    _0 = torch.neg(x)
  return _0

def forward(self,
    x: Tensor,
    h: Tensor) -> Tuple[Tensor, Tensor]:
  dg = self.dg
  linear = self.linear
  _0 = torch.add((dg).forward((linear).forward(x, ), ), h)
  new_h = torch.tanh(_0)
  return (new_h, new_h)
- 混合使用:trace和script可以在代码中混合使用,直接以inline code的形式使用。
比如,序列到序列模型的Beam Search通常用script生成,但编码器模块的推理代码可以调用trace生成。
反之,当模型的大部分只是前馈网络,其中一小部分需要一些控制流时,可以用trace生成大部分的代码,用script生成控制流的代码。
import torch
import torchvision

class MyScriptModule(torch.nn.Module):
    def __init__(self):
        super().__init__()
        self.means = torch.nn.Parameter(torch.tensor([103.939, 116.779, 123.68])
                                        .resize_(1, 3, 1, 1))
        self.resnet = torch.jit.trace(torchvision.models.resnet18(),
                                      torch.rand(1, 3, 224, 224))

    def forward(self, input):
        return self.resnet(input - self.means)

my_script_module = torch.jit.script(MyScriptModule())
Saving and loading models
The archive is a freestanding representation of the model that can be loaded in an entirely separate process.
存档包括:
- code
- parameters
- attributes
- debug information
保存:(ScriptModule) obj.save
加载:torch.jit.load
例如:
traced.save('wrapped_rnn.pt')

loaded = torch.jit.load('wrapped_rnn.pt')

print(loaded)
print(loaded.code)
RecursiveScriptModule(
  original_name=WrapRNN
  (loop): RecursiveScriptModule(
    original_name=MyRNNLoop
    (cell): RecursiveScriptModule(
      original_name=MyCell
      (dg): RecursiveScriptModule(original_name=MyDecisionGate)
      (linear): RecursiveScriptModule(original_name=Linear)
    )
  )
)
def forward(self,
    xs: Tensor) -> Tensor:
  loop = self.loop
  _0, y, = (loop).forward(xs, )
  return torch.relu(y)
如上所示,序列化保留了模型的层次结构和计算图代码。
LOADING A TORCHSCRIPT MODEL IN C++
To load your serialized PyTorch model in C++, your application must depend on the PyTorch C++ API – also known as LibTorch. include:
- shared libraries
- header files
- CMake build configuration files
过程:
- Python:
- a vanilla, “eager” PyTorch model, to a compiled
ScriptModulein Python - save
ScriptModuleto a serialized file on disk
- a vanilla, “eager” PyTorch model, to a compiled
- C++:
- load the file to an executable script::Module in C++.
#include <torch/script.h> // One-stop header.

#include <iostream>
#include <memory>

int main(int argc, const char* argv[]) {
  if (argc != 2) {
    std::cerr << "usage: example-app <path-to-exported-script-module>\n";
    return -1;
  }


  torch::jit::script::Module module;
  try {
    // Deserialize the ScriptModule from a file using torch::jit::load().
    module = torch::jit::load(argv[1]);
  }
  catch (const c10::Error& e) {
    std::cerr << "error loading the model\n";
    return -1;
  }

  std::cout << "ok\n";
}
ONNX Exporter
torch.onnx.export(model, args, f=None, export_params=True, verbose=False, training=<TrainingMode.EVAL: 0>, input_names=None, output_names=None, operator_export_type=<OperatorExportTypes.ONNX: 0>, opset_version=None, do_constant_folding=True, dynamic_axes=None, keep_initializers_as_inputs=None, custom_opsets=None, export_modules_as_functions=False, autograd_inlining=True, dynamo=False)
使用torch.onnx.export将一个torch.jit.ScriptModule或torch.jit.ScriptFunction 导出为onnx模型。如果model不是Script模型,该方法会调用torch.jit.trace() 先将model转换为Script模型,再进行onnx导出。
示例:
# Input to the model
x = torch.randn(batch_size, 1, 224, 224, requires_grad=True)
torch_out = torch_model(x)

# Export the model
torch.onnx.export(torch_model,               # model being run
                  x,                         # model input (or a tuple for multiple inputs)
                  "super_resolution.onnx",   # where to save the model (can be a file or file-like object)
                  export_params=True,        # store the trained parameter weights inside the model file
                  opset_version=10,          # the ONNX version to export the model to
                  do_constant_folding=True,  # whether to execute constant folding for optimization
                  input_names = ['input'],   # the model's input names
                  output_names = ['output'], # the model's output names
                  dynamic_axes={'input' : {0 : 'batch_size'},    # variable length axes
                                'output' : {0 : 'batch_size'}})
torch.onnx.export() 完成torchscript静态图到onnx静态图的转换。
onnx也已经支持部分逻辑操作,如if和loop。
例如:
@torch.jit.script
def foo(x, y):
    if x.max() > y.max():
        r = x
    else:
        r = y
    return r

x = torch.randn(10, 1, 224, 224, requires_grad=False)
y = torch.randn(10, 1, 224, 224, requires_grad=False)

torch.onnx.export(foo,
                  (x, y),
                  "model.onnx",
                  export_params=True,
                  opset_version=10,
                  do_constant_folding=True,
                  input_names = ['input_x', 'input_y'],
                  output_names = ['output'],
                  dynamic_axes={'input_x' : {0 : 'batch_size'},
                                'output' : {0 : 'batch_size'}})
torchscript的graph如下:
graph(%x.1 : Tensor,
      %y.1 : Tensor):
  %3 : Tensor = aten::max(%x.1)
  %5 : Tensor = aten::max(%y.1)
  %6 : Tensor = aten::gt(%3, %5)
  %8 : bool = aten::Bool(%6)
  %r : Tensor = prim::If(%8)
    block0():
      -> (%x.1)
    block1():
      -> (%y.1)
  return (%r)
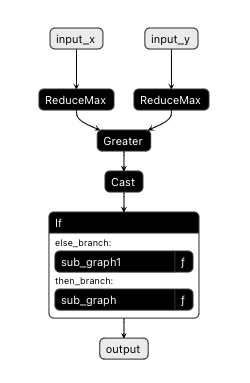
将如上代码导出为onnx图,graph如下:
Exported graph: graph(%input_x : Float(*, 1, 224, 224, strides=[50176, 50176, 224, 1], requires_grad=0, device=cpu),
      %input_y : Float(10, 1, 224, 224, strides=[50176, 50176, 224, 1], requires_grad=0, device=cpu)):
  %onnx::Greater_2 : Float(device=cpu) = onnx::ReduceMax[keepdims=0](%input_x)
  %onnx::Greater_3 : Float(device=cpu) = onnx::ReduceMax[keepdims=0](%input_y)
  %onnx::Cast_4 : Bool(device=cpu) = onnx::Greater(%onnx::Greater_2, %onnx::Greater_3)
  %onnx::If_5 : Bool(device=cpu) = onnx::Cast[to=9](%onnx::Cast_4)
  %output : Float(*, 1, 224, 224, strides=[50176, 50176, 224, 1], requires_grad=0, device=cpu) = onnx::If(%onnx::If_5)
    block0():
      %x.1 : Float(*, 1, 224, 224, strides=[50176, 50176, 224, 1], requires_grad=0, device=cpu) = onnx::Identity(%input_x)
      -> (%x.1)
    block1():
      %y.1 : Float(10, 1, 224, 224, strides=[50176, 50176, 224, 1], requires_grad=0, device=cpu) = onnx::Identity(%input_y)
      -> (%y.1)
  return (%output)
可视化为: